Writing Code
Considering you have done the Terminal section
in the Operating Systems chapter, you already know about vim: the universal
terminal based text editor. I stand by this notion that vim is the supreme editor
when it comes to it's awesome key-bindings, but vim lacks features that other
editors have made normal. For this very reason, you need to use plugins
with vim to make it actually usable. In this section, I show you how to edit
C code faster and better.
Using plugins with Vim
Get Vundle installed so we can add plugins. Go to their repo here
After you have it installed, you will have a default looking .vimrc that should look like this:
set nocompatible              " be iMproved, required
filetype off                  " required

" set the runtime path to include Vundle and initialize
set rtp+=~/.vim/bundle/Vundle.vim
call vundle#begin()
" alternatively, pass a path where Vundle should install plugins
"call vundle#begin('~/some/path/here')

" let Vundle manage Vundle, required
Plugin 'VundleVim/Vundle.vim'

" The following are examples of different formats supported.
" Keep Plugin commands between vundle#begin/end.
" plugin on GitHub repo
Plugin 'tpope/vim-fugitive'
" plugin from http://vim-scripts.org/vim/scripts.html
" Plugin 'L9'
" Git plugin not hosted on GitHub
Plugin 'git://git.wincent.com/command-t.git'
" git repos on your local machine (i.e. when working on your own plugin)
Plugin 'file:///home/gmarik/path/to/plugin'
" The sparkup vim script is in a subdirectory of this repo called vim.
" Pass the path to set the runtimepath properly.
Plugin 'rstacruz/sparkup', {'rtp': 'vim/'}
" Install L9 and avoid a Naming conflict if you've already installed a
" different version somewhere else.
" Plugin 'ascenator/L9', {'name': 'newL9'}

" All of your Plugins must be added before the following line
call vundle#end()            " required
filetype plugin indent on    " required
" To ignore plugin indent changes, instead use:
"filetype plugin on
"
" Brief help
" :PluginList       - lists configured plugins
" :PluginInstall    - installs plugins; append `!` to update or just :PluginUpdate
" :PluginSearch foo - searches for foo; append `!` to refresh local cache
" :PluginClean      - confirms removal of unused plugins; append `!` to auto-approve removal
"
" see :h vundle for more details or wiki for FAQ
" Put your non-Plugin stuff after this line
Before the line: " All of your Plugins must be added before the following line
Add the following:
Plugin 'Valloric/YouCompleteMe'
Plugin 'airblade/vim-gitgutter'
Plugin 'editorconfig/editorconfig-vim'
Plugin 'itchyny/lightline.vim'
Plugin 'junegunn/fzf'
Plugin 'junegunn/fzf.vim'
Plugin 'mattn/emmet-vim'
Plugin 'scrooloose/nerdtree'
Plugin 'scrooloose/syntastic'
Plugin 'scrooloose/nerdcommenter'
Yeah, it's a series of plugins that make vim usable. The only thing you need to
do in addition to this is install the youcompleteme things to make autocompleting
a thing. Follow their install guide.
After that is all in, feel free to explore what the hell you just installed ;). For one, you now have autocompleting, a directory view, and a nice lightline. Check it all out.
Using Vim in another Editor
Sometimes I don't like to use the command line to do my editing of code. Maybe you feel the same. When I don't want to use the terminal (usually for bigger or longer-lasting projects), I use VS Code. Don't worry; it is not the regular Visual Studio. This is a pretty minimal open-source editor that works on all platforms. Especially Linux. It's very good and I recommend using it.
But to make it ACTUALLY usable, it must have vim embedded in it. That's right, vim key bindings. Go ahead and install this vim plugin into your VS Code once you have it installed and setup.
The lists of features in this editor is endless. One of my favorite features is that you edit files on a remote machine with ssh in VSCode. It's super seamless and makes it feel like you are just editing a local file. Check it out.
Using a multiplexer (tmux)
Lastly, you are going to want to use some sort of multiplexer when you are editing code. It helps so you don't need to switch between tabs and such. My setup often looks like this:
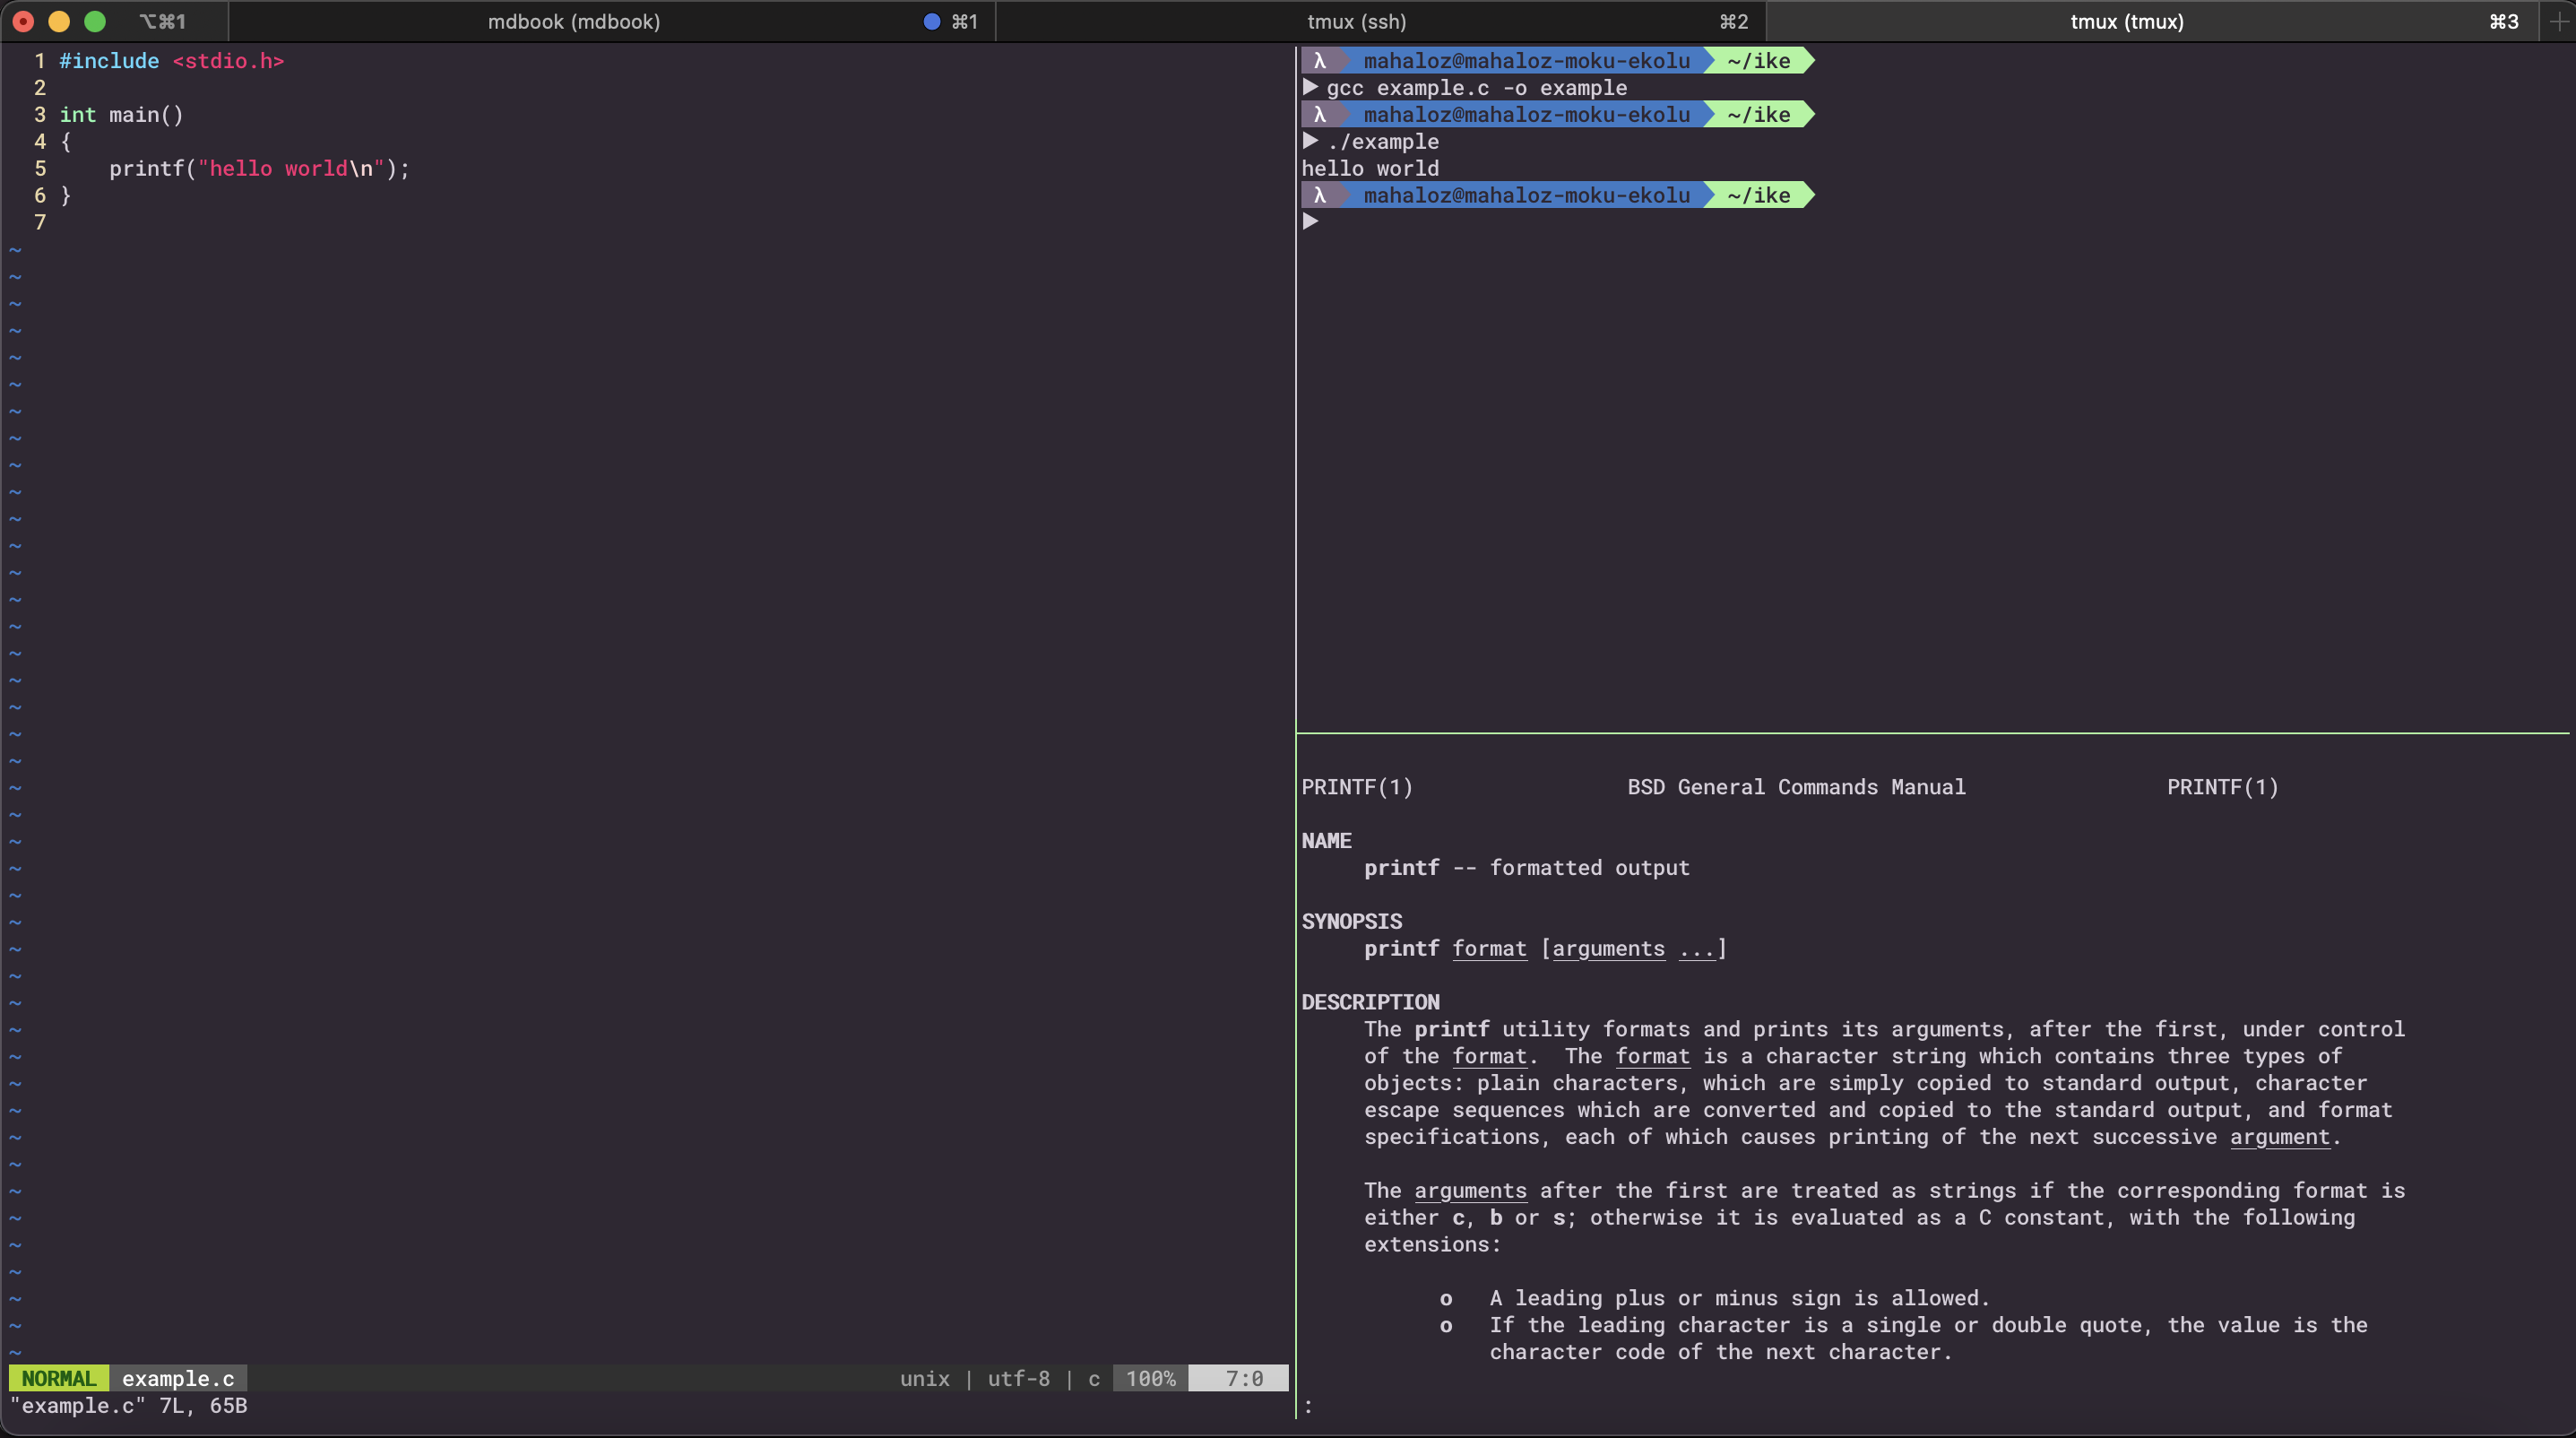
In the left I have the source; In the right I have it split to run commands and
see in/output and also have a man page up for commands I don't understand.
It makes coding in the terminal supa-hot-fire.
This is all made possible with tmux a terminal multiplexer. It's very similar to having a terminal that splits this for you. Many people like to use Terminator for this. I recommend using tmux. It will make you a better hacker and is usable on SSH connections.
Install tmux and xclip:
sudo apt-get install tmux xclip
Then use the config I have specially made to emulate Terminator:
vim ~/.tmux.conf
# Set tmux to split and move like Terminator
bind-key -n C-E split-window -h
bind-key -n C-O split-window -v
bind-key -n 'M-Up' select-pane -U
bind-key -n 'M-Left' select-pane -L
bind-key -n 'M-Right' select-pane -R
bind-key -n 'M-Down' select-pane -D

# Make sure the mouse is useable
set -g mouse on

# Turn the status oon
set -g status off
# statusbar
set -g status-position bottom
set -g status-justify left
set -g status-left ''
set -g status-right-length 50
set -g status-left-length 20
setw -g window-status-bell-style 'fg=colour255 bg=colour1 bold'


# Make the colors good
set -g default-terminal "screen-256color"

# Set copy and paste
set -g mouse on
bind -n WheelUpPane if-shell -F -t = "#{mouse_any_flag}" "send-keys -M" "if -Ft= '#{pane_in_mode}' 'send-keys -M' 'select-pane -t=; copy-mode -e; send-keys -M'"
bind -n WheelDownPane select-pane -t= \; send-keys -M
bind -n C-WheelUpPane select-pane -t= \; copy-mode -e \; send-keys -M
bind -T copy-mode-vi    C-WheelUpPane   send-keys -X halfpage-up
bind -T copy-mode-vi    C-WheelDownPane send-keys -X halfpage-down
bind -T copy-mode-emacs C-WheelUpPane   send-keys -X halfpage-up
bind -T copy-mode-emacs C-WheelDownPane send-keys -X halfpage-down

# To copy, left click and drag to highlight text in yellow,
# once you release left click yellow text will disappear and will automatically be available in clibboard
# # Use vim keybindings in copy mode
setw -g mode-keys vi
# Update default binding of `Enter` to also use copy-pipe
unbind -T copy-mode-vi Enter
bind-key -T copy-mode-vi Enter send-keys -X copy-pipe-and-cancel "xclip -selection c"
bind-key -T copy-mode-vi MouseDragEnd1Pane send-keys -X copy-pipe-and-cancel "xclip -in -selection clipboard"
Usage:
- Split Vertically:
Ctrl+Shift+e - Split Horizontally:
Ctrl+Shift+o - Destroy Pane:
Ctrl+d - Move between panes with
Alt+arrow_key- Example: move left:
Alt+left_arrow_key
- Example: move left:
Lastly, you can now just copy things in your terminal by selecting it with your mouse.
It will automatically copy it while in a tmux session. If you destroy every pane,
it will exit out of the tmux session. Feel free to rebind everything.