Containers
Containers are another level of virtualization that allows for isolated spaces in the kernel to be created and destroyed without affecting each other.
What is a container?
To get more specific, read what Docker has to say on what a Container is: here. Now you may be wondering, how does this differ from a VM? As an end-user, there is no difference. But as far as technicals go, Microsoft's diagram is a good comparison:
VMs vs Containers
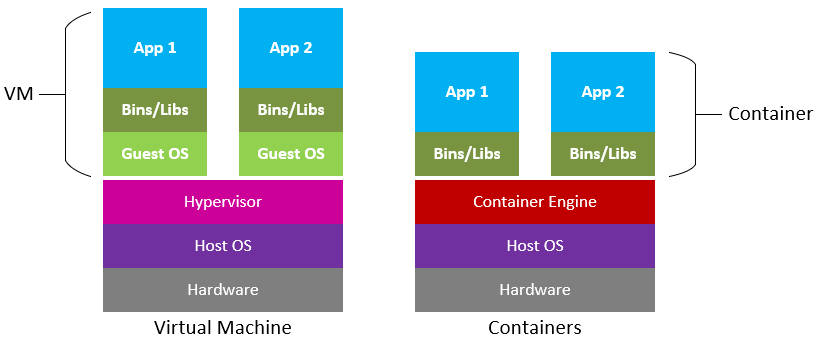
In simple terms, a VM is much more heavy since we need to initialize an entirely new kernel for each VM we make. In a container, we share the already existent kernel and, using some technical tricks, create isolated sections of the kernel that we then use to create containers (which act as VMs).
TL;DR: container light, VM heavy.
Why use a container?
You may be asking yourself, "why use a container?" We already are in a VM, so as far as affecting our host machine goes, we are
already in the clear. Containers become the most useful when trying to run applications that have dependencies that
we might not have access to in our current version of the VM. For instance, wanting to run an Ubuntu 18.04 application
while in Ubuntu 20.04. You can either pray to the computer gods and hope your dependences still work in the new version,
or you can use a docker container that creates an Ubuntu 18.04 environment in it to run. The latter is easier. In addition,
containers are not persistent, meaning that when you are done running the container, everything you created inside of it is
destroyed.
Docker: the modern container
Now that you know what a container is, it's time we set you up to be able to use containers. There are many implementations of containers, but the one we will use is Docker. Docker is very mainstream and has a lot of use across the computer science industry. Take for instance Wordpress, which you have likely heard of or used. It's a platform for building websites for free with a GUI. It also has a lot of dependencies and things you need to set up before using it. Wordpress uses Docker, and has made a docker container that does it all for you. Check it out: here. Essentially you can run an entire wordpress hosting software with a database all with this simple command in a terminal:
docker run wordpress
Which is a great segway into installing Docker, since it requires use of the command line.
Setting up docker
We will now install Docker on your Ubuntu VM, so from now on all instructions are pertaining to being inside
you VM. First login to the VM, then open up the terminal. You can do this by either searching applications or
simple right-clicking the desktop and clicking "Open terminal". This is where the fun begins. Pro-tip,
you can click the copy button in the top left of the code snippets to copy and paste to your terminal.
It's alright if you don't understand all the commands in this section, we will cover using the terminal later.
First, we need to update the list of installable applications. Run:
sudo apt-get update
After that, we need to install the dependencies of docker:
sudo apt-get install \
    apt-transport-https \
    ca-certificates \
    curl \
    gnupg-agent \
    software-properties-common
Next, let's add dockers GPG key so we can get their software:
curl -fsSL https://download.docker.com/linux/ubuntu/gpg | sudo apt-key add -
Add the repository:
sudo add-apt-repository \
   "deb [arch=amd64] https://download.docker.com/linux/ubuntu \
   $(lsb_release -cs) \
   stable"
Finally, update once more and install:
sudo apt-get update
sudo apt-get install docker-ce docker-ce-cli containerd.io
Congratulations, you just installed your first command line tool! And quite a powerful one. Let's verify it works.
Using docker
Verification
To verify you actualy have docker running, simply run:
sudo docker run hello-world
The output should look something like:
Hello from Docker!
This message shows that your installation appears to be working correctly.

To generate this message, Docker took the following steps:
 1. The Docker client contacted the Docker daemon.
 2. The Docker daemon pulled the "hello-world" image from the Docker Hub.
    (amd64)
 3. The Docker daemon created a new container from that image which runs the
    executable that produces the output you are currently reading.
 4. The Docker daemon streamed that output to the Docker client, which sent it
    to your terminal.

To try something more ambitious, you can run an Ubuntu container with:
 $ docker run -it ubuntu bash

Share images, automate workflows, and more with a free Docker ID:
 https://hub.docker.com/

For more examples and ideas, visit:
 https://docs.docker.com/get-started/
Having some fun
To make things a little more interesting, let's launch an older Ubuntu version inside your current Ubuntu version. Virtualception. Let's first see what version we are on in our machine:
grep '^VERSION' /etc/os-release
I'm on Ubuntu 18.04, so my command output this:
VERSION="18.04.5 LTS (Bionic Beaver)"
VERSION_ID="18.04"
VERSION_CODENAME=bionic
You may be on 20.04 so it will look slightly different. Take a note of the version you are on.
Now let's start an Ubuntu 16.04 machine. Run:
docker run -it ubuntu:16.04
Since it's the first run it will take a few minutes for it to pull down the Ubuntu image data. Once it's done, you should see a waiting prompt that looks like:
root@cadd99990677:/#
You have now opened a terminal in a virtual Ubuntu. Congratz. Run the same command from earlier in this prompt:
grep '^VERSION' /etc/os-release
The output should be:
VERSION="16.04.7 LTS (Xenial Xerus)"
VERSION_ID="16.04"
VERSION_CODENAME=xenial
Pretty cool right? We are inside a virtual machine in a virtual machine (technically a container, but you get the point). Now type:
exit
and hit enter. You will be back to your normal terminal. Amazing!
We will use Docker often. If you are excited about this, you can check out this tutorial: here,
though it is not mandatory. Now it's time to learn how to use Bash, the terminal you typed on earlier.